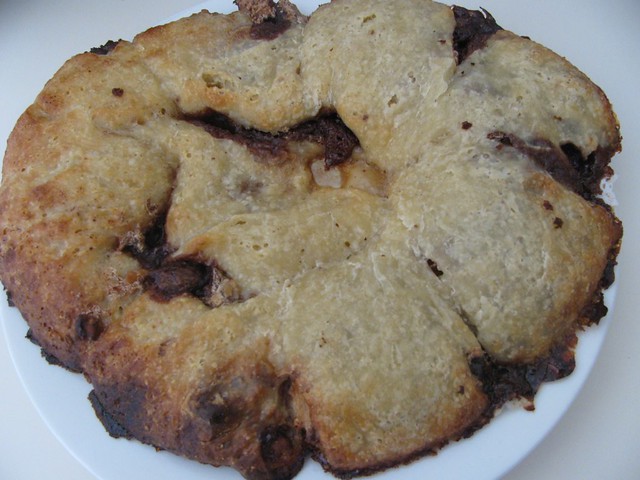
I'm posting late because UB and I have had ridiculous months and when we went to make it I had no flour or money so it got postponed, but its here now. And by jove, is it ugly. I don't even particularly like the taste, but I was planning to eat it all because I hate being wasteful, until (mercifully) some raw mince fell on it and rendered it (more) inedible.
Never cooking during an existential crisis again.
If this has somehow enticed you (or you want to see some other, delightful versions!), you can do so here.
The March 2011 Daring Baker’s Challenge was hosted by Ria of Ria’s Collection and Jamie of Life’s a Feast. Ria and Jamie challenged The Daring Bakers to bake a yeasted Meringue Coffee Cake.
If there's one thing I love in this world, its British sweets. My first job was at a British lolly shop and they told us we had to try everything. Huzzah! So I developed a healthy(?) love for Jammie Dodgers, Jaffa Cakes, Bassett's Jelly Babies, and all that sort of lark.
Jammie Dodgers are one of the foundations of my relationship with Levi. Those, Russell Brand, and Agrum and Turkish Bread. The latter two because I was trying to explain to him when we met at the ball that I wasn't going to the after party, I was going to a friend's place to have Agrum and Turkish bread, and he didn't know what either of those things were. Then to make sure I would get to date him, I wowed him with my knowledge of British things. Russell Brand wasn't big back then, okay, so it made me look cool. I also think that the week between when we met and when we started dating was the only week I've consistently worn perfume, I don't know why I thought that would help but its been three years so I guess it worked! Anyway, he approves of these, and being English I would say his opinion counts for quite a bit.
JAMMIE DODGERS Makes 12 Total time commitment: Half an hour, plus 1 hour chilling and 10 minutes cooking Recipe from Video Jug
160g almond meal
160g plain flour
160g butter
100g caster sugar
One lemon
Raspberry Jam
1. Cream butter and sugar, then add almond meal, flour and lemon zest (I used grated lemon rind). Roll into a ball and cover in cling wrap. Refrigerate for 1 hour.
2. Leave out of the fridge for 10-15 minutes to warm up. Preheat oven to 180C.
3. Roll pastry flat, and cut circles out with a pastry cutter (or a glass, either or). Cut a smaller circle from half of these circles (am I confusing you yet?). I used the wide end of a piping nozzle for the inner circle. Essentially - look at the picture, the top half will have a little hole you can see the jam through, and you want the bottom to not have a hole or it might get messy.
4. Put the biscuits onto a lined tray, pop in the oven for ten minutes. While they're in the oven, melt a few spoonfuls of jam and squeeze in a little lemon juice. Mix together, and then spoon onto the biscuit bases and top with a biscuit top.
~Today's GFF meal was cooked by Levi, because I've been cooped up with a cold/hayfever all week and was too lazy ill to cook ~
I used to have nachos all the time, and then for some reason didn't have them for about a year. Then we went to England (oh 2009, I miss you, with your silly jobs and your overseas holidays). In 2007, I went on a school drama trip to Sydney and because it was around Tara's birthday, I got her a hurricane glass from the Hard Rock Cafe. So when I went to England and actually missed her birthday (its not my fault that the last day of Reading was her birthday!), part of her present was more hurricane glasses!
One is from London. We walked everywhere around London that day, made lots of jokes about Tom being our Tom-Tom because he knew where everything was, and posed for some silly photos (see exhibit A)
Did I mention it was THIRTY TWO DEGREES that day? The actual temperature itself isn't shocking (um, hello, I'm from Australia) but the fact that I was in LONDON when it was 32C was a bit weird. It was in the papers the next day. And by the papers, I mean The Sun. Which is hardly a reputable news source.
So the second hurricane glass was from Paris, where Levi and I spent exactly 48 hours, got lost a bit (we walked for the first two hours we got there trying to find a specific metro station), got free entry into The Louvre and the Musee D'Orsay, went all the way back to the Eiffel Tower from the Arc de Triomphe for more banana and nutella crepes, and had Milka chocolate and pint cans of beer for dinner. The second day, we skipped breakfast and headed straight for the Hard Rock Cafe, where we had this esteemed table
That's totally Bob Dylan's harmonica.
So this is where my nacho revival really kicked in - the nachos I had there were the BEST nachos I've ever eaten, and I've had many a nacho in my time. I don't know if it was because I was really hungry, or that they were using French cheese, but OMGA (oh my giddy aunt, get onto that phrase) they were amazing. And I've recreated them at least once a month since.
NACHOOOOS
Serves two really hungry people who will then complain about being too full, or four reasonable people
Total time commitment: 20 minutes
*Apparently some corn chips aren't gluten free, so if you are intolerant I suppose you know what is happening with all that bizniz but check before you eat them*
1 bag corn chips
400g can red kidney beans
Lots of cheese
Salsa and avocado/guacamole, to serve
1. Empty the corn chips into a dish and preheat your oven to 180C.
2. Drain the kidney beans and put them over the corn chips
3. Grate a buttload of cheese onto the top, and put the dish in the oven until the cheese melts
4. Serve with salsa and your chosen medium of avocado.
This has been a very flour-oriented week, I apologise. If it helps, I've used 2kg of flour in the last week, so thats why. Everything I wanted to make happened to have flour! But I kind of retract that apology because these bagels are incredible.
(I believe its pronounced "baggel")
I've called these poor man's bagels because I didn't have any of the fancy, "essential" ingredients like high gluten flour or malt powder/syrup. If you've ever made bread, chances are you already have everything to make these. When I say "flour", I mean plain flour/all-purpose flour. Don't shy away from the recipe because you have to boil them then cook them - heaven forbid!! - its not too difficult (just time-consuming) and the dough is really nice to work with.
BAGELS Makes 8 Total time commitment: 3 hours on day one (2 hours resting then 20 minutes resting), 45 minutes on day 2. Note that day 2 can be the day after - three days after day 1. Bear with me, it'll make sense. Recipe from The Bread Baker's Apprentice, posted on Smitten Kitchen
1 tsp instant yeast
4 cups flour
2 1/2 cups room-temperature water
--------------------------------------------
1/2 tsp instant yeast
3 3/4 cups flour
2 3/4 tsp salt
1 tbsp honey or brown sugar
--------------------------------------------
Toppings you would like to use, like sesame/poppy seeds
Day One
1. Collect all your ingredients from section one. These will form the "sponge". Mix the yeast into the flour, and for the love of goodness, make sure your bowl is big enough to not spill flour everywhere. Add the water and stir until it forms a mixture not unlike pancake batter. Cover with cling wrap and leave for two hours.
2. Is the mixture foamy and bubbly? If you tap the bowl on the counter, it should knock the mixture down. If that isn't happening, wander off for another ten minutes and check again.
3. Good! Now we're onto the dough. Collect up your ingredients from section two. Add the extra yeast and stir it in. Add three cups of flour, the salt and honey, and stir it in. Slowly add in the next 3/4 cup of flour to stiffen the dough.
4. Transfer the dough to your work surface and knead. Don't flour the surface as you don't want "raw" flour into the mixture, and the dough shouldn't be tacky. If it is, add a little flour. Make sure it passes the windowpane test. If its too dry to windowpane nicely (can you use windowpane as a verb?), add a few drops of water to the dough and continue kneading. You should knead for around 10 minutes by hand, or 5 minutes by machine.
5. Divide the dough into your bagels! I made 125g bagels if I recall correctly, and they were big enough to fill me up in the morning. Don't worry about making them bagel-shaped right now, just get them into rolls. Cover with a damp cloth and leave for 20 minutes.
6. Line two trays with baking paper, and then add a little olive oil to the baking paper (if you have spray oil, use that. Don't omit this step - I thought I could just use baking paper without oil and ended up with some bits of baking paper on my bagel). Now you get to make your bagel holes! All you need to do is stick your thumb into the middle of the bagel and wriggle it around a bit to form a hole in the centre.
7. Place the bagels 5cm(ish) apart on the trays. Cover them lightly with olive oil (again, a spray one would do well, but I put some on my hands and brushed them. We're all class on this blog), cover with plastic wrap and leave to sit for another 20 minutes.
8. Here's the fun bit! Fill up a bowl with water and drop a bagel in there. If it floats within 10 seconds, you are golden. Pat your little soldier bagel dry and put the bagels in the fridge overnight, your job now is done. If it doesn't, leave the bagels out for another 10 minutes and try again. Note that when I say "leave your bagels in the fridge overnight", this can be anywhere from overnight to two days.
Day Two (or three or four)
1. Preheat the oven to 230C, with two racks set in the middle of the oven. Boil some water in a large pot.
2. Remove the bagels from the fridge and gently drop them in the water. Keep your baking paper, we'll use it again to cook them and be nice to the environment. Perhaps give it another light misting of olive oil, though. The bagels should be floating, which means you'll need to flip them after a minute or two (two minutes gives you chewier bagels). Once they're all boiled and back on the tray, pop them in the oven for five minutes, then rotate the pan 180 degrees so they cook evenly. Check back in another five minutes, but I let mine cook for 15 minutes overall to give them a nice, golden, bagel-y colour.
3. Remove the bagels from the tray immediately (or you'll get their little bottoms stuck) and cool on a wire rack. Yum!
I remember the first time I ate these. A bunch of us were having brunch and the Uber-Blonde (I'm going to refer to her as UB from now on, because I'm lazy) brought these along. There was confusion everywhere. Why are there scones at breakfast? Where is the jam? WHAT DO YOU MEAN THEY'RE SAVOURY?
All very rational reactions, I feel. And needless to say (because I've made them myself now, six months later), I enjoyed them once I got over the initial shock. I was originally intending to make cheesy American biscuits from a recipe from a magazine, but this recipe (Dorie Greenspan's Basic Biscuit recipe) was so much simpler. They tasted best straight out of the oven, even though I kept the biscuits in an airtight container they dried out fairly substantially. Not that it stopped me eating them, though!
As a note: The reason I've titled this "American" biscuits is because what we call biscuits in Australia are what Americans call cookies. "Cookies" isn't really a term over here, at least not a commonly used one. Similarly, I'm fairly sure the hotcakes I posted the other day would be referred to as pancakes in America, our pancakes are thinner than that. Woo for cultural differences!
280g plain flour
2 tsp sugar
1/2 tsp salt
90g cold, unsalted butter, cut into pieces
3/4 cup whole milk
1. Preheat the oven to 220C. Line a baking tray with baking paper.
2. Combine dry ingredients in a bowl. Cut the butter in to the dry ingredients - this means you need to work the pieces of butter in to the dry ingredients using your fingertips. When you're done, it should have a crumbly consistency.
3. Add the milk and combine with a fork (we're all about the fancy utensils in this kitchen, I know) until the dough is soft. Do away with the fork, make sure your hands are clean and get in there and knead! It should only take three or four turns until everything is combined, but you don't want any stray flour at the bottom of the bowl (something I struggle with daily, I promise).
4. Lightly dust your work surface with flour and roll the dough out/pat out with your hands (again with the fancy utensils attached to your arms) until it is a couple of centimetres thick. Use a biscuit cutter (or glass) to cut out the biscuit shapes and place them onto the baking tray. The dough can be re-rolled (I'm sorry, did someone just say
Yeaaah.)
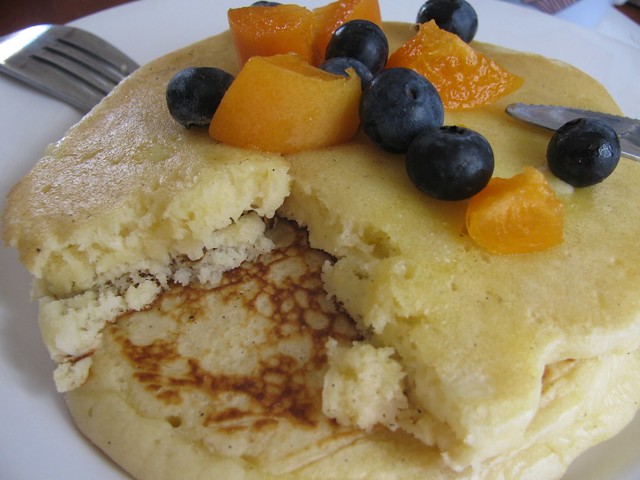
I'm starting to rather enjoy this whole "proper breakfast" ritual. Also, blueberries were inexplicably cheap this week and I didn't know what else to do with them (honestly, not much of a muffin person)/couldn't be bothered searching for recipes.
I'm starting to have mild freak outs every so often now that I'm not living with a family member for the first time in my life. When I went to make pumpkin scones, the Golden Wattle cookbook was gone because it's Tara's and she took it when she moved (luckily it was on the internet because damned if I ever use a different pumpkin scone recipe). When I went to make pancakes, the huge kids' cook book was gone as well, I presume Tara has that because her amazing choc-chip cookie recipe is from there. Luckily, I had this is a substitution, and I'm starting to think I prefer these to pancakes.
HOTCAKES Makes 8 large or 12 medium hotcakes Total time commitment: About half an hour Recipe from The Junior Cook
2 cups self-raising flour
1 tsp baking powder
3 eggs
1 1/2 cups milk
1/2 tsp vanilla essence
50g butter, melted, plus extra for cooking
1. Combine eggs, milk and vanilla in a jug and beat until well combined.
2. In a separate bowl, combine flour and baking powder, and make a well in the centre. Add milk mixture and melted butter, and stir until just combined. Lumps are fine!
3. Melt a little butter in a pan over a high heat, and add 1/4 of a cup of mixture. Cook until small bubbles appear on the surface, then flip and cook the other side for a minute or so. Repeat for the rest of the mixture.
NOTES:
- Leftover mixture can be stored in the fridge for 1-3 days.
- You can mix fresh berries or fruit through the mixture just before cooking for a delicious alternative
I've developed a sort of system to get me through the weeks now that uni is back on, and I still have work and panto and bi-weekly sewing days at Grandma's (which is where I'm headed this afternoon and I can't wait!).
Actually, before I get onto that, I've had a quest for about six months to buy a bento box. It started out as an "Oh, wouldn't that be cool?" idea, then Tara gave me Lunch box Revolution for Christmas.
I was totally sold on the idea when Levi and I went into (probably) every Morning Glory store in Sydney and Melbourne, but I *still* couldn't find one that was exactly perfect. Then I got home and looked on a bunch of websites, until finally I realised that eBay would probably help. Help it did, my friends! On Monday, my bento box arrived and it is splendid. I recently bought a satchel for uni, and this is so much more spatially economical than three different containers (which means the bag actually closes, something I thought I might never see). Also, so many adorable bento accessories! So this is my new lunchbox (don't even get me started on the quest before this for a regular lunchbox):
As you can see, its from eBay seller blueberryland, and I had absolutely no problems with them. Free P&H? WHEN YOU'VE MADE THE SALE, STOP SELLING! Although, I would recommend getting one with a fork, or having a miniature fork that fits in the fork section, but if you don't its a good place to sneak some biscuits or other reasonably flat treats.
So we're all sold on the idea of a bento box, or at least a reasonable lunchbox? Good good. Let's get on to my brilliant system then.
As I briefly mentioned with the pumpkin scone recipe, some days you just need to grab and run when it comes to breakfast. For me, thats Thursdays when I start uni at 8:30 and need to get the bus by 7:15. Wednesdays aren't *too* much better - I start at 9:30 but I'm normally rushing around printing lecture notes so I don't have time to cook breakfast. Both of these days are pretty full-on as well - Wednesday I have uni 9:30 - 4:30, and Thursday 8:30 - 5:30 (with a four-hour gap in the middle on Thursdays, remember I'm doing an Arts degree!). So the system: Spend Monday and Tuesday, when I'm essentially free until 3:30, cooking lunch and breakfast for the week.
(This is all relevant, I promise)
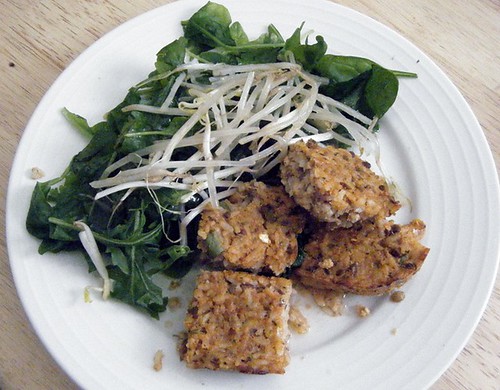
This week's lunch was lentil loaf! Hurray, relevance! This is a great recipe because you can make it quite easily and add a whole bunch of stuff or make any amount of substitutions (some are included in the notes at the end). I've made it twice, the first time I added red kidney beans and mushroom, and the second time I added cooked sweet potato. Good. Times.
Also, The Uber-Blonde is a benevolent blogger and let me use her photo because I managed to forget all week and now its all eaten up.
LENTIL LOAF
Makes 10 serves
Total time commitment: 30 mins prep, 45 mins cooking time
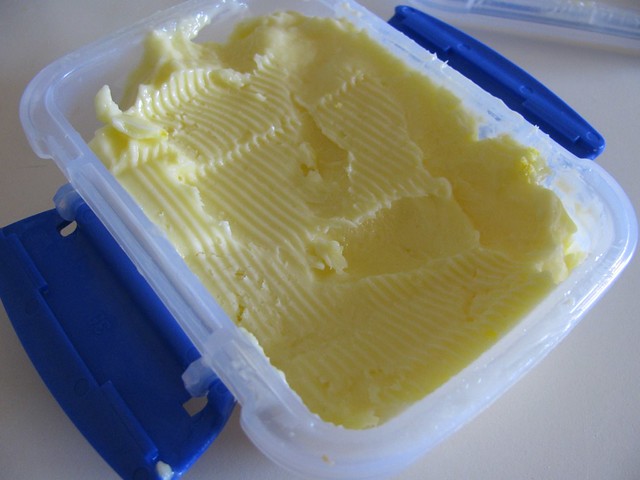
Do you have an ultimate comfort food that makes you happy, no matter what? For me, comfort food isn't something you make when you're sad, just something that makes you happy when you eat it. It used to be mashed potato until I had a bad incident with instant mash. But pumpkin scones are the BEST, you don't even know. Drop everything and make them immediately.
And with homemade butter? LORDY. Have some with a cup of tea for a mid-afternoon snack. Nuke them for 30 seconds and eat on the way out the door in the morning. Just have some, please. It will enrich your life.
I've been wanting to make homemade butter since I read about it on a blog a while ago. It conjured up memories of Year 1 when we made our own butter, and then I found out that its even easier to do with an electric mixer. When you've made the sale, stop selling, internet! Everyone has also mentioned its a good source of entertainment for kids to make their own butter, and my memories of Year 1 can attest to that.
Keep watching for a scrumptious snack to go nicely with your homemade butter, I promise it was a little source of heaven all week for me.
HOMEMADE BUTTER
150mL cream makes about 100g butter
Cream
Strong arms or a stand mixer
1. With stand mixer: Put the cream in the bowl.
With brute force: Put the cream in a jar or container, leaving some space at the top for expansion.
*Want to add extra flavourings to make chilli butter? Garlic butter? Nutmeg, cinnamon, salted? Add them now!*
2. Make sure the lid is secure and shake away, or put the mixer on a medium-low heat. You want the butter to be yellow and separated from the buttermilk otherwise it will spoil very quickly! You can reserve the buttermilk for cooking if you like.
Alycake (and Aly, the Vigilante) was the main inspiration behind GFF. I thought that it would suck to not be able to eat gluten, so originally I was going to do gluten-free week to challenge myself to make things that were tasty and quick and non-glutenous. Then I was like, OR I can do something every week. In retrospect, a lot more (continuous) work, but it's fun! Also now that the Uber-Blonde is GF as well, its nice to know that I can always steal recipes from her blog to replicate if I have an uninspired week. Heh.
So guys, this is Aly, eating her Alycakes at Tim Minchin last weekend.
Actually, before I introduce you, can I just take a second to say OH MY GOD TIM MINCHIN WITH AN ORCHESTRA BLEW MY MIND. And that here is a photo of me and Miss Italia dancing (he hadn't even started by this point, we just decided to get our groove on).
Ok, carry on.
ALYCAKES Makes 12 small cakes Total time commitment: 40 minutes Adapted from recipe on the Xylitol website
2 eggs
75g almond meal
75g sugar
Pinch of baking powder
Vanilla essence (see note below)
1. Preheat oven to 180C. Beat eggs and add other ingredients. Mix until smooth, pour into cake tin and bake 15-20 minutes.
TADA.
But seriously, flavour these however you want. I tried orange, as in the original recipe, but it didn't really do it for me. I've done them with no flavouring in the mixture but lemon zest grated on top. Its a pretty stock-standard gluten free recipe, which just means you can keep adapting it to your (or your lucky gluten-free buddy's) tastes! Bravo, recipe. Bravo.
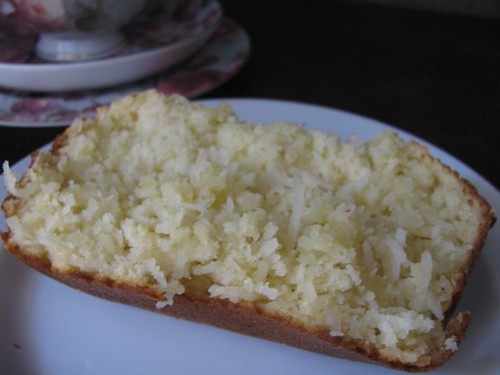
Good morning pumpkins! I hope your week has started off splendidly. I overslept and now I'm a bit grumpy (not that I missed anything, but its true that when you turn off your alarm and fall back asleep you feel worse when you eventually get up), but I'm going grocery shopping soon and then working through my massive to-do list before Panto starts up again tonight! Its Scooby-Doo themed, and we find out the casting tonight. Fingers crossed my Velma-esque haircut swayed the casting panel a bit :P From what I've heard so far, the script is hilarious so I am mucho excited.
I was also mucho excited to make this Jamie Oliver recipe coconut bread, because I thought it would be a good breakfast food, and gosh-darn was I right! My only problem was that there was a lot of sugar (luckily after reading the UB's post on Jamie Oliver sorbet, I had the foresight to halve it when I thought the measurement was excessive) and it was kind of cakey in consistency as opposed to bready, but I also undercooked it a little so the middle was still a bit doughy and that could be why. Regardless, it was a nice breakfast and snack food while it lasted!
COCONUT BREAD Serves 8-10 Total time commitment: 1 hour 30 minutes, most of which is baking Adapted from Jamie Magazine, Sept/Oct 2010
1. Preheat oven to 180C and grease a loaf tin with butter. Whisk eggs and milk together.
2. Combine dry ingredients (flour, sugar, coconut and vanilla) in a bowl. Make a well in the centre and gradually add egg mixture, then butter, mixing until smooth.
3. Bake for one hour.
Notes:
- The original recipe calls for 200g each of sugar and coconut
- Recommended loaf tin size is 22x8cm
- You are pretty :)
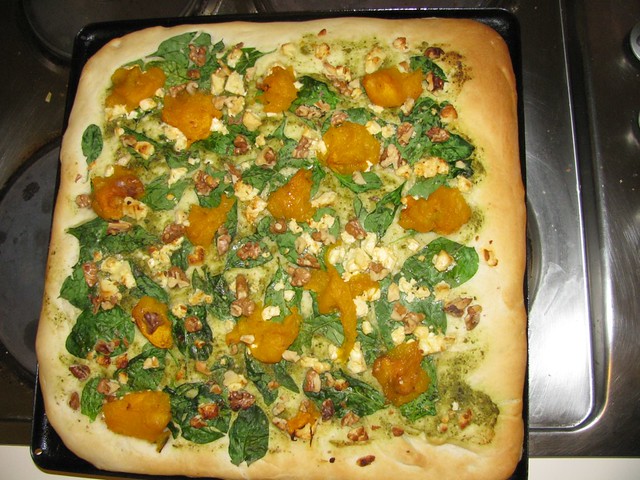
Ignore the quality of the photo, focus on the deliciousness of the pizza and how evenly spread the toppings are. It was possibly the best pizza I've ever eaten, ever.
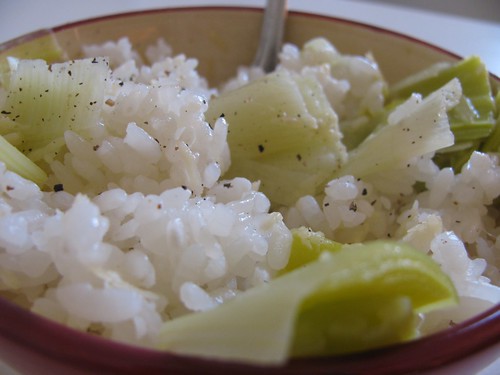
I don't want to constantly "resort" to rice as a staple of my GFF meals, so I'm trying to avoid it entirely, but this was too good to pass up. I bought a bunch of leek on a whim at the farmers' market (goodness knows why, because its a winter vegetable and we're in the middle of a darn heatwave, so it was expensive) and had to find a way to use it all up once it was cooked. This ticked all the boxes for a weekend meal - quick, easy, not too many ingredients, delicious, and I didn't have to think too much to cook it. Perfect, no?
If you've read my previous risotto recipe, I found a rather ingenious way to cook risotto on Not Quite Nigella that doesn't involve slaving away over a hot stove for 40 minutes. Just for funsies, I actually made risotto the *proper* way for the Vigilante one night, and it didn't taste markedly different. Actually, I hated that risotto, but thats another story for another day.
LEEK AND PARMESAN RISOTTO Serves 4 Total time commitment: 45 minutes (including 20-30 minutes cooking time)