Pages

Monday, August 30, 2010

Baking Basics: Butter Icing

Butter icing is one of those things that I am probably going to use whenever I make a cake. It is just so gosh-darn easy, and it tastes nice, and everyone should learn how to make it.

There's a few variations on butter icing, and it all depends on your taste. I generally start with 1:1 for butter and icing, and you can modify that as you want. Some people also add a splash of milk - I do that sometimes but normally I like to save the milk for the cup of tea I'll invariably be having with my freshly-baked goodies :)

BUTTER ICING

For 18 large cupcakes or one standard-size cake

100g unsalted butter
100g icing sugar

1. Combine until smooth.

SERIOUSLY, that's it. Of course, you normally want to flavour it or colour it or maybe even both (LOOK OUT). If so, once its combined, you need to add in your flavouring/colour and then combine it. Here are some suggestions:

- Melt some dark, white or milk chocolate (as you wish). Or combine them!
- Put some cocoa, coffee or Milo into a cup and mix with a little hot water to make a paste
- Put a few drops of flavouring essence into the icing - vanilla or peppermint (in chocolate icing... mmm choc mint) or whatever takes your fancy!
- Mocha icing: Combine cocoa and coffee!
- Put a few drops of food colouring in and combine until you get to the desired colour
- Grate some lemon/lime/orange rind into the icing

Chocolate Avocado Cake

On Sunday night I told Tara I would make her a 21st cake, considering her birthday is today (HAPPY BIRTHDAY, MAN) but her party (complete with cake!) isn't for another two weeks. I had great plans to get up early today and find a recipe before I went shopping, and then I woke up late and Gordo (so named for his resemblance to this guy right here) finished uni early so it was a GIANT. CATASTROPHE.

So when I got home, after blatantly lying to Tara and saying I wasn't going to make her a cake at all (tee hee!), I had to find a recipe that wouldn't involve me having to walk down to the shops to buy more stuff. I had just gotten home from grocery shopping, gimme a break. Luckily, I am meticulous with bookmarking recipes I think sound lovely and in my "Sweets" file I found this! I got the recipe from Not Quite Nigella, who got the recipe from Joy the Baker, who I think got it from a cookbook?

I tweaked the recipe a bit - less out of choice or experimentation than necessity. I halved the recipe rather than making a layered cake, used wholemeal flour, used less cocoa powder (we ran out, and I didn't think Milo would work as a substitute) and used raw instead of brown sugar (which I only just realised now, while writing the recipe out).

The dividing lines in the ingredients are just so you don't do what I did and forget to separate the wet and dry ingredients. Balls.

The best bit was, I didn't tell anyone it was an avocado cake until AFTER they'd eaten it, lest they protest about even trying the cake. It worked, everyone liked it! I also covered it with Milo butter icing, which was delicious (and needless to say, makes it decidedly un-vegan... but otherwise, we're good).


CHOCOLATE AVOCADO CAKE

1.5 cups plain wholemeal flour
2 tbsp cocoa powder (unsweetened)
1/4 tsp salt
1 tsp baking powder
-------------------------------------------
1 cup raw sugar
--------------------------------------------
1/8 cup olive oil
1/4 cup soft avocado, mashed
1 cup water
1 tbsp white vinegar
1 tsp vanilla essence


1. Preheat the oven to 180C. Grease the cake tin.

2. Combine all of the dry ingedients, sans sugar (everything until the first dotted line).

3. Combine all of the wet ingredients (the last part of the ingredients list). Add the sugar and combine.

4. Add the wet mix to the dry mix and whisk (by hand!) until smooth. Pour into the baking dish and cook for 30 minutes or until a skewer comes out clean.


Sunday, August 29, 2010

Toadstool Cupcakes


I love being part of a society where you can hold the committee position of Biscuit Wench. My responsibility (as I recall, and correct me if I'm wrong, people who know!) is to bring "delicious baked goods" to rehearsals.

After three weeks of rehearsals three times a week, I finally stepped up today. Considering it was a Sunday and all, I didn't really have an excuse for not bringing anything.

Also, have I sung the praises of this book yet? It is a lifesaver. These cakes were so simple and (more importantly, when you are running late) quick! I've butchered the recipe a little, but it tasted fine and all the cakes were eaten within 10 minutes by some hungry cast members :)


TOADSTOOL CUPCAKES

Makes 24 mini cupcakes (or, I imagine, 12 regular cupcakes)

Cupcakes:
100g unsalted butter
100g self-raising flour
100g caster sugar
2 eggs
-------------------------------
Icing:
50g icing sugar
50g butter
Red food colouring
-------------------------------
Other delicious:
White fondant icing OR white choc drops OR slivered almonds OR cachous


1. Preheat oven to 180C and grease cake tins with butter. Do this really well or you will rue your decision later!

2. Combine all the cupcake ingredients and then spoon into the trays and pop them into the oven. The cooking time will vary depending on what size you have made your cakes so keep an eye on them!

3. Getting the cakes out of the tin may prove to be an issue. If you have a silicone cupcake tray, I imagine it isn't so bad *lusts after one*, but I just ran a knife around the edges and pulled them out and it worked quite well.

4. While the cakes are cooling (or cooking!), combine the icing ingredients. It took me quite a lot of red food colouring and they still ended up a bit pink, but this is up to you. Obviously. I'm not in your kitchen stalking you. OR AM I.

5. No, I'm not. Unless you're Tara, in which case I am because we share a kitchen.

6. Ice the cooled cupcakes with your icing.

7. Place your white toadstool spots on the cake. I cut up the slivered almonds into more manageable sizes, but I would have preferred to have little circles cut out of white fondant. WHY MUST THE GROCERY STORE FAIL ME IN MY HOUR OF NEED. Alternatively, you could dot white choc chips on there. Get creative, peeps!

8. Admire your handiwork before popping one in your mouth.

Wednesday, August 25, 2010

Pumpkin Gnocchi


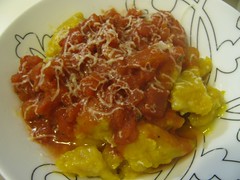
I made regular potato gnocchi one when I still lived with mum and dad, and it was a disaster. So I didn't have high hopes for the pumpkin gnocchi, but it was lovely and simple and helped me finish the six kilos of pumpkin! This is one of the many, many recipes I've bookmarked from Closet Cooking. It helps if you have an entire pumpkin cooked, mashed and frozen in portions in the freezer, I'm just putting that one out there.

I made this once with a white sauce, and then froze the rest of the gnocchi and cooked it last night with a tomato sauce. Both were perfectly acceptable.


PUMPKIN GNOCCHI

2 cups cooked, mashed pumpkin
2 cups plain flour

1. Mix together

2. Flour the bench and roll out a handful of the dough into a sausage shape

3. Cut it up into bite-size pieces. Do this for all the dough.

4. Cook the gnocchi in boiling water until it rises to the top of the saucepan

5. If you want to freeze some, squirrel it away now! If not, eat it with all its delicious goodness.


Sunday, August 15, 2010

I'm sorry!


I knowww, I've been very lazy with posting, but I have caught the cold/flu/illness that's going round so I've been wrapped up in my warm blanket and only getting out of bed to tackle uni assignments and panto rehearsals.

It doesn't help that I can fold our couch out into a bed right in front of the TV, and that a friend just bought Tara and I Mario Kart for the Wii. I will have you know that I have gotten quite good, quite quickly in the last few days.

But never fear! I am going to have baking adventures with the Uber-Blonde (that is what you get for being the only (?) blonde in the Panto society) next weekend, and once I get these assignments underway I'll start beng more diligent. I promise!

Tuesday, August 10, 2010

Eggplant Parmigiana


I started writing this mid-cooking last week, then started running late for Panto (even more so than I was!) and neglected it until today. Catchups!

I bought an eggplant on my weekly shopping trip with Gordo (so named because of his resemblance to this guy right here), and I couldn't think of what on earth to do with it so I adapted this from my usual Vegetarian Schnitzel recipe, which goes:

1. Put schnitzel in a baking tray
2. Cover with a can of diced tomatoes
3. Cover with cheese and put in the oven for 15 minutes while you make some spaghetti to eat it with.

I did get halfway through this and have a horrendous moment where I thought we had no diced tomatoes, but thankfully I'd bought some on special the week before last week. CRISIS AVERTED, GUYS.


EGGPLANT PARMIGIANA

This was more than enough for me, it could have fed anywhere from two very hungry people to four moderately hungry people. I suppose it depends on eggplant sizings and how much pasta you like.

1/2 a large eggplant, sliced (I do like... 1.5cm slices, its up to you)
1 small onion, diced
1 tsp crushed garlic
Olive Oil
1 small can diced tomatoes (you know, regulation can size... 400mL or so)
Cheese (I used tasty, gruyere and parmesan)
As much pasta as you like!

1. Salt the slices of eggplant and leave them to drain for about half an hour. This makes them easier to cook, apparently. MUM SAID TO DO IT OKAY, TRUST ME.

2. Meanwhile, back at the ranch, cook up the onion in the garlic and olive oil. Step back for a minute and smell how good it is (bonus smell points if you substitute olive oil for butter). Add the tomatoes and make it into a base. Saucy!

3. See what I did there with the 'saucy' pun?

4. Put the eggplant in a baking dish and pour the tomatoes over the top. Grate some cheese onto there and put it in the oven for about 15-20 minutes - I judge it by how melty and delicious the cheese is.

5. While this is happening, cook some pasta. I use fettuccine. Put that in a bowl, put a slice of eggplant/tomato/cheese on top, and away you go!


Sunday, August 8, 2010

Monday, August 2, 2010

Three Cheese Risotto


I admit it. As absolutely, blissfully simple as this dish is, there is no way I was able to make risotto look sexy (or even just plain appetising), so I have stolen this picture from Big Bites Little Bites. And now that I look at it - their risotto is in the microwave, WHAT


THREE CHEESE RISOTTO 
from Not Quite Nigella

1 1/2 cups arborio rice
1 1/2 cups cheese (I use grated Tasty and Parmesan and crumbed fetta)
4 cups vegetable stock

1. Heat the stock while you grate the cheese so that it is hot.

2. Put the rice and cheese into a baking dish. Mix them about a bit. (I KNOW, A BAKING DISH? Surely you must be crazy, Emily! I assure you, dear little apple, that I am not. Bear with me)

3. Pour over the hot stock

4. Cover the dish with alfoil and place in the oven that you clearly preheated to 200C for 40 minuten.

Mine still comes out a bit runny, but that doesn't make it taste any less delicious, let me tell you. I tried adding mushrooms and other vegetables but the troops protested. Hopefully you have more luck, let me know if you find a splendid variation!

Sunday, August 1, 2010

Boyfriend Bakes: Fairy Cakes

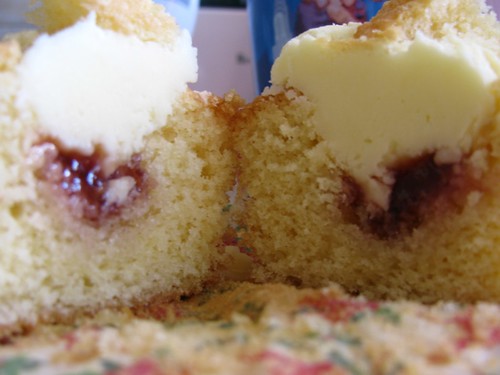
This is my first 'guest' recipe - my Boyfriend made these while I was diligently studying yesterday and they were a success, regardless of the fact that I still maintain that they are BUTTERFLY cakes and should not have jam and should have whipped cream, etc etc etc. But thats another post for another day! The basic recipe is from 500 Cupcakes, which is a great book because the recipes are quick and easy enough for him to bake unsupervised :P

ALSO IN EXCITING NEWS - I found out one of my friends also has a food blog! It is amazing and you should read it right now.


LEMON FAIRY CAKES

Makes 12 - 18 large cupcakes

Cupcakes:
225g unsalted butter
225g caster sugar
225g self-raising flour
1 tsp baking powder
4 eggs
lemon zest (he used grated rind of one lemon and some lemon juice)
------------------------
Icing:
115g unsalted butter
225g icing sugar
-----------------------
Other delicious:
Strawberry jam


1. Preheat oven to 175C and prepare the trays with cupcake cases. Combine all the cupcake ingredients and spoon into the cases. Bake those bad boys for about 20 minutes.

2. While the cakes are cooling, combine the icing ingredients.

3. Use a teaspoon to dig out a well from each of the cupcakes. Spoon some strawberry jam into the newly-formed cupcake void and top with icing.

4. Cut the bit that should be sitting where the cupcake is now filled with jam and icing in half to make wings, and stick them on top of the cake.

5. Boil the kettle while you finish assembling the cakes and then eat them with a cup of tea or coffee.